
Today, I’m excited to guide you through a superior way to monitor your solar panel output: the voltage, current, power output, and overall energy production of your solar panels, whether it’s a single panel or an entire DIY system you’re setting up.
This blog post is based on one of my YouTube videos. You can watch the video below or keep reading to get the same information with images.
Traditional Monitoring Methods
Now, in the past, I’ve generally relied on a good old clamp meter for monitoring the current. Those of you considering using a clamp meter, keep in mind that you’ll need the right version. For instance, the Klein Tools CL120 is a budget-friendly clamp meter, but it lacks DC current monitoring. For DC monitoring, you’d need a more advanced version, like the Ideal 61-747 or Klein Tools CL390.

Once equipped with the right clamp meter, all you have to do is clamp it around one of the conductors to get the current amperage your solar panel or system is generating. For voltage, I usually relied on the multimeter function of the same clamp meter to monitor the open circuit voltage. This method is great for comparing your readings with the specification sheet attached to your solar panel.

Limitations of Traditional Methods
However, these traditional methods always seemed a bit inadequate to me. They’re excellent for capturing a snapshot of the open circuit voltage and current, but they fall short when you want a more comprehensive understanding of your system, especially when you’re setting up multiple panels in different wiring configurations like series, parallel, or series-parrallel.
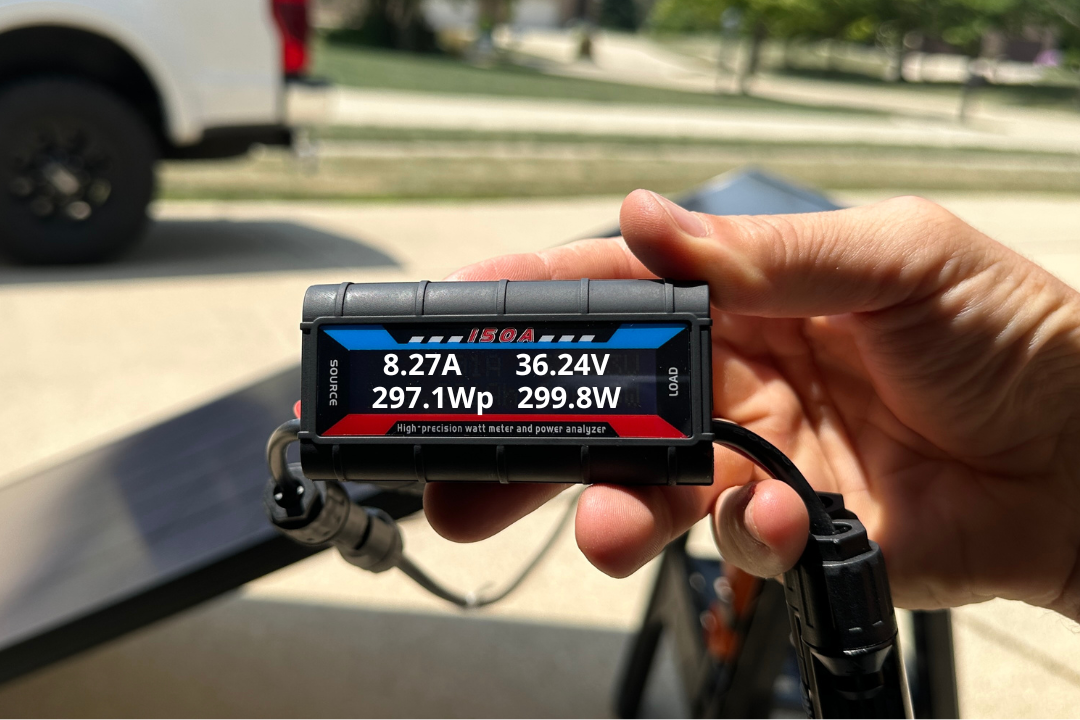
The Power Analyzer: A Better Solution
For a small investment, you can get your hands on a tool that provides much more detailed information: the power analyzer. For just around $13 to $15 on Amazon, you can get a simple power analyzer. These handy little gadgets are often used for remote control cars, drones, car battery analysis, and yes, they’re great for solar panels. Do take care picking the right power analyzer for your application most have a voltage range from 0-60V but the one I tested can go up to 100V.

Hands-on With the Power Analyzer
This power analyzer can provide real-time data on current amperage, voltage, and overall power output. And it doesn’t stop there. It also accumulates data over time, giving you the total energy production of your solar system.
As soon as you plug this unit in, it begins accumulating data. Let me give you a quick rundown of what you’ll see on its LCD display. The top two numbers stay the same, but the left bottom indicator rotates through different data points.

1. Current: The amount of current flowing from the solar panel.
2. Voltage: The voltage your panel or system is producing.
3. Watt-Hours: The total energy produced during the test.
4. Peak Amperage: The highest amperage recorded during the test.
5. Average Voltage: The average voltage recorded during the test.
6. Peak Power: The highest power output recorded during the test.
7. Amp-Hours: The total amount of electric charge transferred during the test.
The power analyzer is incredibly straightforward to use. You’ll just need to connect it in line with your MC4 connectors. One caveat is that the power analyzer will come with just the small positive and negative wires. You will need to install the MC4 connectors yourself. For more information on how to install MC4 connectors, I’ve got a separate blog post and video.

Final Thoughts
For all your DIY solar setup questions or even if you’re thinking about getting a professional installation, feel free to check out our Facebook group. You’ll find a helpful community of homeowners, professionals, and myself ready to answer your queries.
If you’re wondering about the cost of installing solar panels on your roof to eliminate your power bill, check out this link. You’ll just need to input some information about your home and location, and it will give you a rough estimate of what a solar system for your home might cost.
So, there you have it, a simple and affordable way to get more detailed insights into the performance of your solar panel or system. I hope this post has been helpful, and I look forward to hearing about your solar projects.